WHAT IS THE VISUAL BASIC EDITOR?
In the previous lesson we saw how to check the code generated when we record an Excel macro. This code was created in a new window and only can be maintained in it. This window is what we call the Visual Basic Editor.
So the Visual Basic Editor is a different application within the Excel file that is running in the background while you maintain that file open.
Even if you don’t open this application, whenever you run a macro or a VBA procedure, Excel will use the code previously maintained in it.
HOW TO ACCESS TO THE VISUAL BASIC EDITOR?
As in the case of checking the code generated by a macro, whenever we want to create a new VBA procedure or maintain an existing one, we need to open the Visual Basic Editor by clicking the Visual Basic icon in the Developer tab.
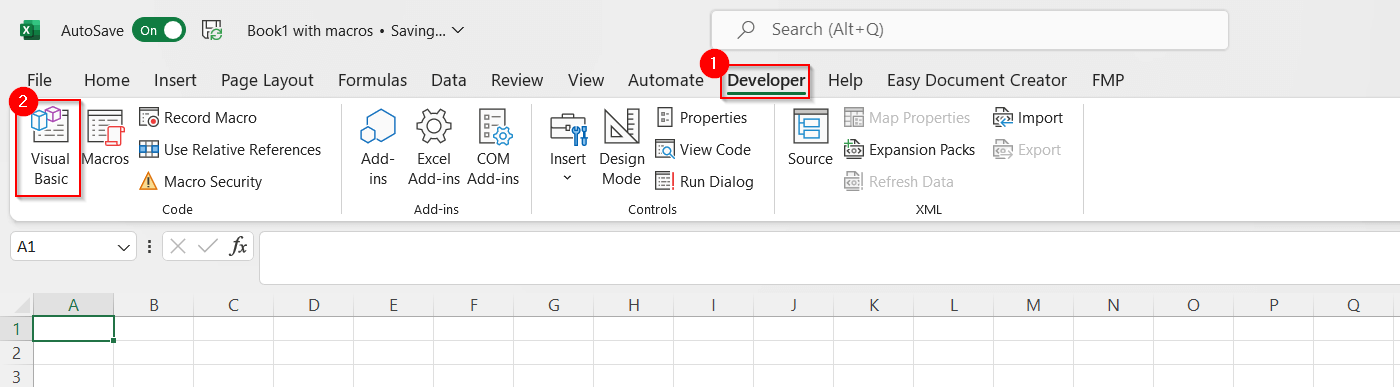
It is also possible to access directly through the shortcut Alt+F11. And once in the Visual Basic Editor, if we press again Alt+F11 we return to the Excel spreadsheet.
WHAT ARE THE PURPOSE OF THE DIFFERENT WINDOWS WITHIN THE VISUAL BASIC EDITOR?
The first time we open the Visual Basic Editor we see different windows within the same application. It is possible to arrange these windows with a different layout and saved the new configuration, so you might view a different structure if previously changed.
Below you can se the different components of this application.
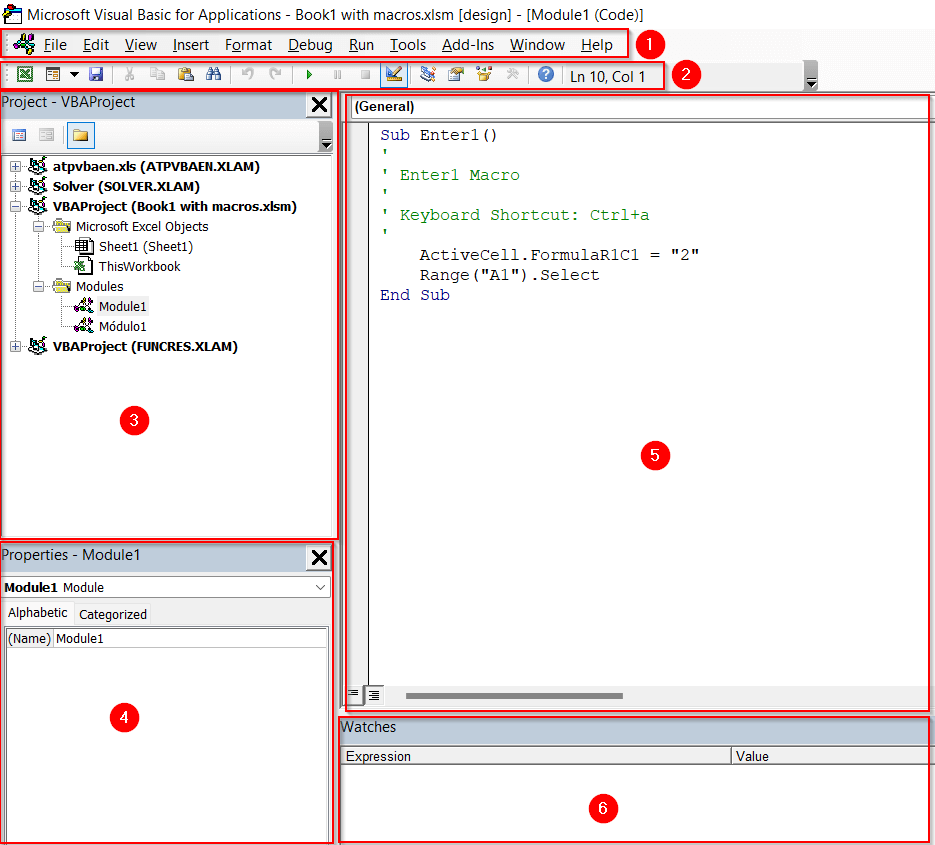
- Menu Bar
- In the Menu Bar, you can see all the different available functions to execute or configure sorted by their type of functionality.
- Toolbar
- As navigating through the menu would take some time, some of the functions more frequently used are readily available in the Toolbar (same as in the Excel spreadsheet).
- The Toolbar can be configured so we can personalize the commands that it will display. For doing that you need to go to the menu option View -> Toolbars.
- Project Explorer Window
- This window will display a tree structure with every workbook currently open in Excel (including add-ins and hidden workbooks).
- You can expand or contract every node just by double-clicking it or clicking its + or – sign in its left.
- Once we select any of the lowest levels of the tree (sheets, modules, …), we will see how the rest of the windows are updated with their specific information.
- We can close this window if we want to leave more space for the rest of the elements. But we can open it again at any time pressing Ctrl+R or through the menu option View -> Project Explorer.
- Properties Window
- In the Properties Window we can see the settings of the lowest level selected in the Project Window.
- For a module we only have the property name, but when we select a sheet we can see some additional properties.
- Theses properties can be changed directly in this window.
- Code Window
- The Code Window will show the different procedures created for the different objects (lowest level nodes in the Project Window).
- In order to see the code associated to a an object, we need first to double-click it in the Project Window.
- Within the Code Window there are two dropdown boxes at the top:
- The left one: In sheets it is possible to store the code specifically for the spreadsheet or as a General. In this dropdown box we can select at which level it is stored.
- The right one:
- This dropdown box will show all the different procedures created for this object, so we can quickly select the one that we want to display or maintain.
- But in the case of the worksheet, we will also see all the different events that can trigger some desired actions we want to code.
- Watches
- Once we have created a VBA procedure and want to check how it is working (to debug it), it can be useful to track which values are being taken for some variables.
- Especially in those cases with complex calculations, this functionality is key in order to find bugs or errors and fixing them.
- Other windows
- Although not shown by default, there are two other windows used for debugging that can be activated:
- Locals Window
- Immediate Window
- They can be activated in the menu option View.
- Although not shown by default, there are two other windows used for debugging that can be activated:
HOW TO CUSTOMIZE THE VISUAL BASIC EDITOR?
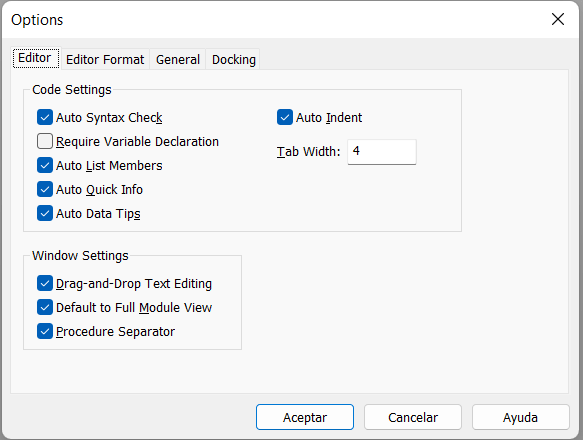
In order to customize the layout and options that you want to use when programming in Visual Basic for Excel, you access to the menu option Tools -> Options.
You will see the following pop-up window:
In it we can see the following tabs:
- Editor
- In this tab we set up some settings affecting to the code entry:
- Auto Syntax Check: The Visual Basic Editor will pop-up a window with every syntax error found. If not set it will just highlight them in a different color.
- Require Validation Declaration: It will add by default the code Option Explicit at the beginning of each new module, making it mandatory to declare a variable before its use.
- Auto List Members: The Visual Basic Editor will propose a list of options available for completing a sentence.
- Auto Quick Info: It will display information about functions and their arguments as we type them.
- Auto Data Tips: It will display the value of a variable over which your cursor is placed when you are debugging code.
- Auto Indent: It will indent the new sentence as the previous one.
- Drag-and-drop Text Editing: It let’s copy and move code text just dragging and dropping it.
- Default to Full Module View: If it is set for a module, you will be able to see all procedures in the same window instead of one at a time.
- Procedure Separator: If it is set, it will add a bar for separating the modules, so it will be easier to see when each of them ends and the new one starts.
- In this tab we set up some settings affecting to the code entry:
- Editor Format
- In this tab we can set up the format of the text that is going to be displayed in the Code Window.
- General
- In this tab we can set up some general settings about the Form editor and the execution of code.
- Docking
- In this tab we can define if we want to dock or fixed some of the windows or let them as different windows inside the main one.
- The Code Window is the only one that cannot be docked.
- In this tab we can define if we want to dock or fixed some of the windows or let them as different windows inside the main one.
Recent Comments